
Before and After.

Before and After.
![]() by A Lister Fri Nov 22 2013, 16:50
by A Lister Fri Nov 22 2013, 16:50
I briefly thought about keeping it as an ‘oily rag’ type restoration but felt it was too far gone for that, as there are plenty of better examples of the Lister D in original paintwork out there. I also have a fully restored and repainted 1940 Lister D, so why would I want another? So the D was left in a corner of the shed while I got on with other projects and decided what to do with it. During that time I also had chance to find replacements for the missing and broken parts.
To paint, or not to paint, that was the question? I was struggling to decide… then I had a daft idea; why not just paint half of it?! The more I actually thought about this idea, the less daft it seemed... I could put an imaginary line right down the centre of the engine and restore and repaint the right hand side of it, but leave the left hand side with just a light coat of oil to slow the rust down. This would make an otherwise common engine a little bit more interesting for the rally-field, and the public could see an example of how us stationary engine enthusiasts can restore a rusty old relic to look and run like new, or to look old but still run like new!
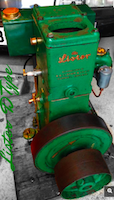
I decided to start with the cylinder head/hopper to give me a good centre line to work from for the rest of the engine... but soon found the task I’d set myself was going to be a bit harder than I thought! The casting on this mid-wartime engine was much rougher than on my 1940 Lister D, which made measuring the centre line difficult as the sides weren’t particularly parallel. As you can probably imagine, the transfers were a bit of a nightmare to do as well. Not only did I have to cut them to join to the existing transfers, but the reproduction transfers also seem to be a slightly different size to the original ones (the original ‘Lister’ script is slightly bigger, but the rest of the text appears to be slightly smaller and finer than it is on the reproduction transfers I'd got). This meant I had to carefully cut down each line of text to reduce it's height slightly, then apply it separately, which wasn't easy for me. My hands are a bit on the large side for delicate work too; after two sets of transfers and some swearing I eventually managed to get it to look about right!
The transfers were still drying out when this photo was taken, so they’re still slightly milky-looking, and the 50/50 boiled linseed oil & white spirit mix on the left hand side needs to dry for a few weeks before it can be handled. I still have to paint inside half the square plug, but need some good light before I do that! Anyway, the following photo should give you an idea of how its going to look once it’s finished:

I had chance for an hour or two in the shed earlier this week to start stripping the rest of the engine down for mechanical inspection and cleaning. Luckily I managed to remove the gib key without too much drama and take the flywheel off, so that should make things easier. I’ll post another update when I’ve made some more progress on ‘Before and after’. Thanks for reading and I hope you like it.

Last edited by A Lister on Tue May 12 2020, 02:55; edited 1 time in total
_________________
Jules.

A Lister- A true Stationary engine owner

- Posts : 166
Join date : 2013-01-04
Location : South Cheshire
Re: Before and After.
![]() by Lewis MacRae Fri Nov 22 2013, 17:39
by Lewis MacRae Fri Nov 22 2013, 17:39
_________________
Lewis
 , x2 Lister D, x1 IHC LAA, x1 Lister L, x1 Wolseley WDII, x1 Amanco Chore Boy, x1 Fairbanks Morse Z 3 HP, x1 Crossley 1030?
Lewis MacRae- Admin
- Posts : 699
Join date : 2012-11-02
Location : Inverness, Scotland
Re: Before and After.
![]() by Guest Fri Nov 22 2013, 18:09
by Guest Fri Nov 22 2013, 18:09
keep us posted, interesting project
jon
Guest- Guest
Re: Before and After.
![]() by Abes Fri Nov 22 2013, 18:18
by Abes Fri Nov 22 2013, 18:18
_________________
 A stationary engine is like peeing your pants, everyone can see it but only you get that nice warm feeling:
Abes- Admin
- Posts : 1269
Join date : 2011-07-24
Age : 64
Location : Ringwood
Re: Before and After.
![]() by matt86 Fri Nov 22 2013, 18:58
by matt86 Fri Nov 22 2013, 18:58
looking forward to see whats like when is done , Matt
_________________
Reproduction amanco silencers made , contact me for details
matt

matt86- Admin
- Posts : 5577
Join date : 2011-03-29
Age : 37
Location : swindon/ faringdon
Re: Before and After.
![]() by 110samec Fri Nov 22 2013, 19:37
by 110samec Fri Nov 22 2013, 19:37

110samec- Born to be wild

- Posts : 15
Join date : 2011-05-02
Age : 28
Location : Holyhead, North Wales -

Re: Before and After.
![]() by A Lister Fri Nov 22 2013, 20:09
by A Lister Fri Nov 22 2013, 20:09
I had a think about the flywheel rim Jon. I did consider taking half of it back to bare metal, but thought that half a polished flywheel rim flashing round in the sun at 1000 rpm might not be too comfortable for spectators!
_________________
Jules.
A Lister- A true Stationary engine owner
- Posts : 166
Join date : 2013-01-04
Location : South Cheshire
Re: Before and After.
![]() by kevjhnsn Sat Nov 23 2013, 01:54
by kevjhnsn Sat Nov 23 2013, 01:54
when i was arround jules the other for a brew or 2 and a chat ,i could clearly see the the point of the idea ,its a before and after all in one ,
its already starting to stand out from all the others hes done ,as they are done up the dogs bobbins,
cant wait to see how he does half a trolley
kev
_________________
" IF YOU DONT DO ANYTHING " "" YOU'LL NEVER MAKES MISTAKES "" 
kevjhnsn- Life Member
- Posts : 3596
Join date : 2011-02-10
Age : 45
Location : south cheshire
Re: Before and After.
![]() by A Lister Tue Mar 18 2014, 19:06
by A Lister Tue Mar 18 2014, 19:06
The engine was put on the workbench and completely stripped down for cleaning and inspection:

Which is just as well as it seems that someone had forgotten to drill the little end bearing oil hole!

Apart from that, everything appeared to be in good order and it seems this engine has done very little work, with no detectable wear… even on the gudgeon pin and little end bearing, despite the lack of oil hole. The crank-case was then cleaned out and the old engine oil and sludge was bottled up for safe disposal in the waste oil tank at the local recycling centre. Look at the gloop in there; imagine that getting mixed up with a pint of fresh engine oil and doing the rounds with the bearings! One reason I never try to get an old engine running again before cleaning everything out.

Once it was clean I could set about removing the rust and remnants of old paint from the ‘After' side.

The bore was then lightly honed to remove the glaze and the original piston rings were tried in the bore in various positions to assess the gap. This gaps were found to be well within tolerance, so the original rings were carefully refitted to the piston ready for reuse.

The paint job could then be continued on the ‘After’ side of the engine. However, when I came to fit the new gaskets I found the newness of them stuck out like a sore thumb on the ‘Before’
side. So I found a way of ‘antiquing’ them to blend in. Well, if half a job’s worth doing, it’s worth doing half properly…. or something like that!

Once the main parts of the engine were painted (or half painted!) I could start the re-build, and the bottom end of the engine is now back together again. I’ve just got the tank straps, flywheel and magneto bracket to give the ‘Before and After’ treatment to now, the inside of the water plug on the head needs doing, and the fuel tank has just had its first half coat of gloss. So nearly there now, but it's been a long and fiddly job!
I couldn’t resist a sneak preview of how it’s going to look the other day, so I placed the top and bottom back together for a quick photo. You'll see what I mean about the gaskets, as I just placed the head gasket on so I could mark the dividing line. It’s since been given the ‘antique’ treatment so blends in OK now. Thanks for reading, I’ll update the thread again once it’s all back together.

_________________
Jules.
A Lister- A true Stationary engine owner
- Posts : 166
Join date : 2013-01-04
Location : South Cheshire
Re: Before and After.
![]() by Abes Tue Mar 18 2014, 19:11
by Abes Tue Mar 18 2014, 19:11
_________________
A stationary engine is like peeing your pants, everyone can see it but only you get that nice warm feeling:
Abes- Admin
- Posts : 1269
Join date : 2011-07-24
Age : 64
Location : Ringwood
Re: Before and After.
![]() by kevjhnsn Wed Mar 19 2014, 00:21
by kevjhnsn Wed Mar 19 2014, 00:21
abesAbes wrote:Love this idea mate really look forward to seeing it all finished and running
you mean half finished and running surely mate
jules
shes coming along well since i seen you last mate
looking great and different ,you must be over half finished now mate
just added the last of the top coats today to the shafty then i can start bolting it back together
just a load of old brass to polish and nuts when tightened down to final topcoat and maybe at weekend add some decals
while i still awaith the flaming piston and ring set to arrive
kev
_________________
" IF YOU DONT DO ANYTHING " "" YOU'LL NEVER MAKES MISTAKES ""
kevjhnsn- Life Member
- Posts : 3596
Join date : 2011-02-10
Age : 45
Location : south cheshire

steve w- Life Member
- Posts : 503
Join date : 2012-09-15
Age : 52
Location : Nr Wolverhampton
marknva- Born to be wild
- Posts : 18
Join date : 2014-03-05
Age : 37
Location : Lichfield
Re: Before and After.
![]() by callum12 Fri Mar 21 2014, 23:49
by callum12 Fri Mar 21 2014, 23:49
though, surely you should have only honed half the bore, how ever you could do that! i'm sure people would appreciate a healthy lister rather than that level of detail.
have fun!!
_________________
callum12- A credit to the forum
- Posts : 249
Join date : 2013-10-03
Age : 26
Re: Before and After.
![]() by Guest Sat Mar 22 2014, 07:43
by Guest Sat Mar 22 2014, 07:43
Janner
Guest- Guest
Re: Before and After.
![]() by A Lister Sat Mar 22 2014, 10:40
by A Lister Sat Mar 22 2014, 10:40
You're right Janner, it would have been easier to have restored either the front or the back half, but I think it would have lost some of the visual impact, particularly the effect with the old and new lettering. The idea of doing it this way is that people walk along the engine line and, depending which way they are heading, they notice a restored or unrestored Lister D, but as they get closer they go "Wait a minute... what's that!". If I'd done it the other way then I don't think people would noticed the 50/50 effect as much?
I won't be doing another engine like this though, that's for sure, talk about fiddly and frustrating. Masking it up for preparation and painting so it's straight and everything lines up has caused a lot of swearing!
_________________
Jules.
A Lister- A true Stationary engine owner
- Posts : 166
Join date : 2013-01-04
Location : South Cheshire
Re: Before and After.
![]() by Guest Sat Mar 22 2014, 11:51
by Guest Sat Mar 22 2014, 11:51
Guest- Guest
Re: Before and After.
![]() by A Lister Tue Jun 03 2014, 13:39
by A Lister Tue Jun 03 2014, 13:39
After a couple of years of searching I managed to find a sound fuel tank of correct spec for the engine. It had just enough original paint left on it to look in keeping with the engine, and came complete with a nicely tarnished brass fuel cap. The inside needed the usual 'gravel and water cocktail shaker treatment' to get rid of rust scale, etc.. Once the inside of the tank was sorted, work on the outside could start. A couple of small dents needed filling and sanding on the ‘After’ side, which took time to get right, as did the paint finish (once again, this was applied by brush).
Unfortunately, the pot of paint has started to get a bit old now and doesn't flow out as well, and a few bits of dust have found their way into it, so getting a good paint finish is becoming more difficult, especially on a smooth, flat surface! This is the reason I like to paint the fuel tank and any other smooth, flat surfaces first when the paint is new and fresh. I couldn't do it this time though, as it took me ages to find a suitable tank! Anyway, here’s a photo of the finished item:

Next up was the trolley. I managed to source an original Lister D barrow-type trolley from a Forum member. This trolley was ideal for what I wanted because the woodwork needed replacing as rats had gnawed large chunks out of it at some time in the past when it was stored in a barn.
Once new woodwork had been cut, the trolley was given the ‘Before and After’ treatment to match the engine. The metalwork at the handles end was sanded, rust treated and given two coats of black paint, the metalwork at the wheels end was cleaned and given a thin coat of boiled linseed oil and white spirit 50/50 mix to preserve the original finish. The woodwork was masked to match the dividing line on the engine, one side was carefully sanded and varnished, the other side was 'antiqued' to give the impression it had been there for 70 odd years.
Once the varnish and painted metalwork dried, the trolley was put back together and I had the enjoyable job of building the engine up.
So, nearly there now and hopefully on target for the 1000 Engine Rally later this month, which should be the first time out for 'Before and After'.... let’s just hope the blinking thing starts after all that time I’ve spent on it! Anyway, here’s a sneak preview of progress to date. Thanks for reading:

_________________
Jules.
A Lister- A true Stationary engine owner
- Posts : 166
Join date : 2013-01-04
Location : South Cheshire
Re: Before and After.
![]() by callum12 Tue Jun 03 2014, 13:56
by callum12 Tue Jun 03 2014, 13:56
looking forward to seeing with running
_________________
callum12- A credit to the forum
- Posts : 249
Join date : 2013-10-03
Age : 26
Re: Before and After.
![]() by kevjhnsn Thu Jun 05 2014, 18:10
by kevjhnsn Thu Jun 05 2014, 18:10
half a job as always
coming along well now mate
see you i a week or two
kev
_________________
" IF YOU DONT DO ANYTHING " "" YOU'LL NEVER MAKES MISTAKES ""
kevjhnsn- Life Member
- Posts : 3596
Join date : 2011-02-10
Age : 45
Location : south cheshire
Re: Before and After.
![]() by HobbyPaul Thu Jun 05 2014, 22:41
by HobbyPaul Thu Jun 05 2014, 22:41
_________________
Lister D 1949? ... Villiers MK25 1964 ... Villiers F15 ... Hopefully a John Deere in the future
HobbyPaul- Expert

- Posts : 53
Join date : 2014-05-13
Re: Before and After.
![]() by matt86 Thu Jun 05 2014, 23:10
by matt86 Thu Jun 05 2014, 23:10
matt
_________________
Reproduction amanco silencers made , contact me for details
matt
matt86- Admin
- Posts : 5577
Join date : 2011-03-29
Age : 37
Location : swindon/ faringdon
Re: Before and After.
![]() by StewartH Fri Jun 06 2014, 13:58
by StewartH Fri Jun 06 2014, 13:58
best
Hamish

StewartH- A credit to the forum
- Posts : 410
Join date : 2013-07-04
Location : Hampshire
Re: Before and After.
![]() by A Lister Mon Jun 16 2014, 20:16
by A Lister Mon Jun 16 2014, 20:16
Well, we have the ‘new’ side:

We have the old side:

And we have the bit in the middle:

But does it run? Of course it does… it’s a Lister! (click on the image to watch and scroll down to see the video, it seems to play up sometimes for some reason, so you might have to come back to it later and try again if it won’t play!):

Did it start first go? Well, almost… it fired twice then nothing. A quick check showed a healthy spark at the plug so it must be a fuel issue. I couldn’t smell much petrol from the sparkplug hole, so I removed the mixture wheel and needle, gave the needle a wipe over, and put it back. Turned it over a few times and then refitted the plug, turned the starting handle a few times and off it went.
A bit of fettling with the mixture setting once it had warmed up and it ran non-stop for the next two and a half hours before it finally ran out of petrol. It just needs a final check over and an oil change and it’s ready for the 1000 Engine Rally. Thanks for reading, and if you happen to see this engine when you’re out and about at a rally be sure to say hello.
_________________
Jules.
A Lister- A true Stationary engine owner
- Posts : 166
Join date : 2013-01-04
Location : South Cheshire
|
|
|