Lister H4 Pump Disassembly
+8
chrismac
neil (LE)
Foden
Robotstar5
oldgit
tony RA
68jcb
matthew92
12 posters
Page 6 of 6
Page 6 of 6 •  1, 2, 3, 4, 5, 6
 Re: Lister H4 Pump Disassembly
All Looking good Neil, I had a mag that was in a similar condition to yours, I stripped it down got the coil rewound, got a bearing but never fitted it yet, thats been since years, but its on the to do list when I pull the engine out the back of the shed its stored in,
The mag cleaned up pertty good, its great how these things can be refurbished and given a new lease of life.
Looking forward to seeing your engine and pump running,
Chris
The mag cleaned up pertty good, its great how these things can be refurbished and given a new lease of life.
Looking forward to seeing your engine and pump running,
Chris
chrismac- A true Stationary engine owner

- Posts : 162
Join date : 2013-07-12
Age : 48
Location : Wick, Caithness
 Re: Lister H4 Pump Disassembly
Nice to see it back together and running again. Perhaps have a look round for a Champion 8 COM plug (or a Lodge BBL if you can find one!), I find my Lister Ds and A run nicely on those, plus you can take them apart to clean them.
If buying a used plug at an engine rally (remember those?!) then take a multi-meter with you and make sure there's no resistance between the threaded end terminal and the electrode at the other end. If there is, then it's a dud so don't buy it, as it could put more strain on an already aging coil.
If buying a used plug at an engine rally (remember those?!) then take a multi-meter with you and make sure there's no resistance between the threaded end terminal and the electrode at the other end. If there is, then it's a dud so don't buy it, as it could put more strain on an already aging coil.
_________________
Jules.

A Lister- A true Stationary engine owner

- Posts : 166
Join date : 2013-01-04
Location : South Cheshire
 Re: Lister H4 Pump Disassembly
My go to plug is a D16 for all my listers but if stuck they will run on anything, I keep them cleaned and gapped and the engines run happily.
A good working magneto is the key.
Maryalice
A good working magneto is the key.
Maryalice
maryalice- Life Member

- Posts : 1235
Join date : 2010-01-23
Age : 70
Location : Bedfordshire
 Re: Lister H4 Pump Disassembly
Hi I'm back again, I agree that the D16 works well in a Lister, it's what I have successfully used in the past, both in my "A" and the "D". I'd also like to get hold of a Champion 8 Com or a Lodge BBL, however not much chance of that at the moment though, no auto-jumbles or rally stalls to browse through. I put a new modern Denso type spark plug in while I was having difficulties with the engine running, which I have now sorted by fitting a new capacitor. Now it seems to be running as well as it ever was, I can hopefully put the old D16 back in again.
Jules good advice on ensuring the plug isn't soft, hadn't thought about it but it could easily stress a weak coil, causing it to fail, not cheap to repair. I have undertaken some basic test on the RS 1 coil and it does seemed to have failed, the secondary winding measures as open circuit. I will look into replacement / rewinding but either of these option could cost more than the value of the engine, so it might have to continue to operate with the SR 1 mag that it is currently fitted with.
Not been able to do too much on the project this week, as I have had to install some sun screening material on the top of the chicken run. Not a little job as the run is 5 mtrs long x 2.5 mtrs wide x 2 mtrs high and I've had to make frames to stretch the material over. So far I've made up and fitted three out of the six required! However I have managed to couple the "D" to the pump and after a lot of messing around, which required the fast and loose guide to be temporarily fitted using G clamps, to hold the belt in line. With an amount of hand assistance, the engine was able to turn the pump over, although during each cycle the belt did slip, it did manage to continuously operate the pump. This test was undertaken with the pump dry, as in no water but lubricated, just enough testing to generally indicate that with a little more time and adjustment, I will hopefully be able to pump water without too much more effort. Famous last words, springs to mind.
Neil
neil (LE)- A credit to the forum

- Posts : 398
Join date : 2012-03-21
Age : 68
Location : N/W Kent
 Re: Lister H4 Pump Disassembly
Hi, well what have I been up to for the last couple of weeks. In reality, as far as the pump and engine is concerned, not a lot. Circumstances conspired to interrupt the progress, the easing of lock down meant I was required to undertake some other activities, including garden centre shopping, the fact the engine and pump were now outdoors, just as the weather broke, meant it wasn't easy to set either the pump or the engine up and because of that I got distracted with another project (a little water cooled, in line four stroke, side valve, twin) on the bench in the dry, maybe more about that at another time.
What I have managed to undertake is the repair to the Lister D petrol tank. I had thought I would follow the suggestion of soldering a sheet of tin, over the rusted out area on the base of the tank. However when I looked into it, I wasn't convinced that my large iron would be up to the job. Also I didn't have any suitable material, apart from old bean cans, I also discovered that there were rust holes in the top of the tank, as well as those in the bottom, the repair of which would have been very visible.
Instead of the soldered repair I have decided to use a filler. I had bought some POR 15 Patch Filler and Seam Sealer, to repair the fuel tank on the Jowett (Scott) generating set with good results. I was pleased to find that the tube was still soft, although it had been opened and used on the other tank over a year ago. I applied the sealer as best as I could, remembering that once this stuff goes off, it is as hard as the proverbial nail. It has to be applied to a totally dry surface and must be allowed to fully cure for up to 96 hours before it is used. Once it is cured, it is impervious to almost anything and can be smoothed down but is very hard, so do not expect to be able to rub it down as you would a normal filler, so you need to get as smooth as possible when applying it in the first place.
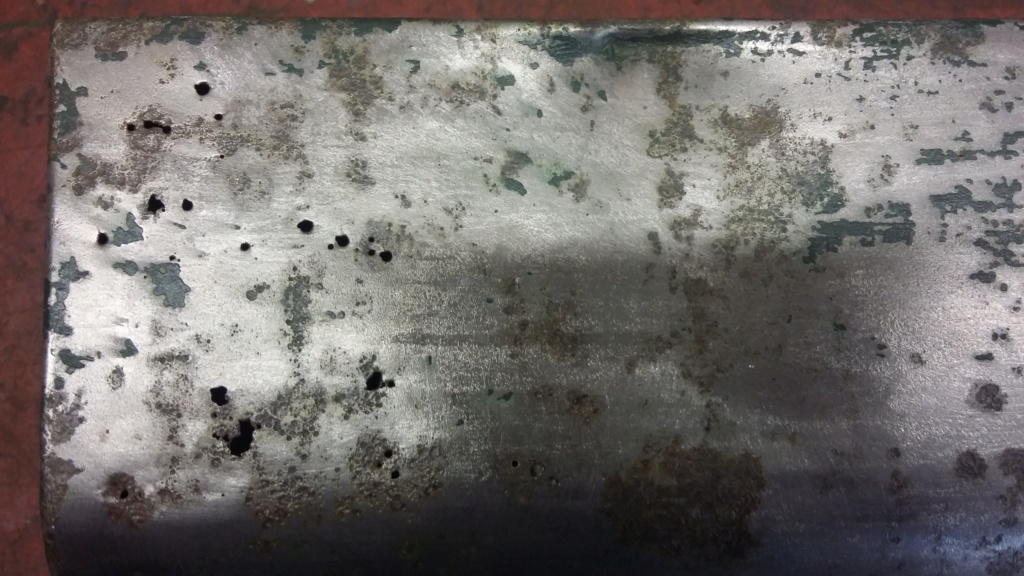
The rusted through tank base

Filler applied to the tank base.

First attempt at smoothing the filler down. Note the large crease caused by over tightening (not by me!) the tank straps.
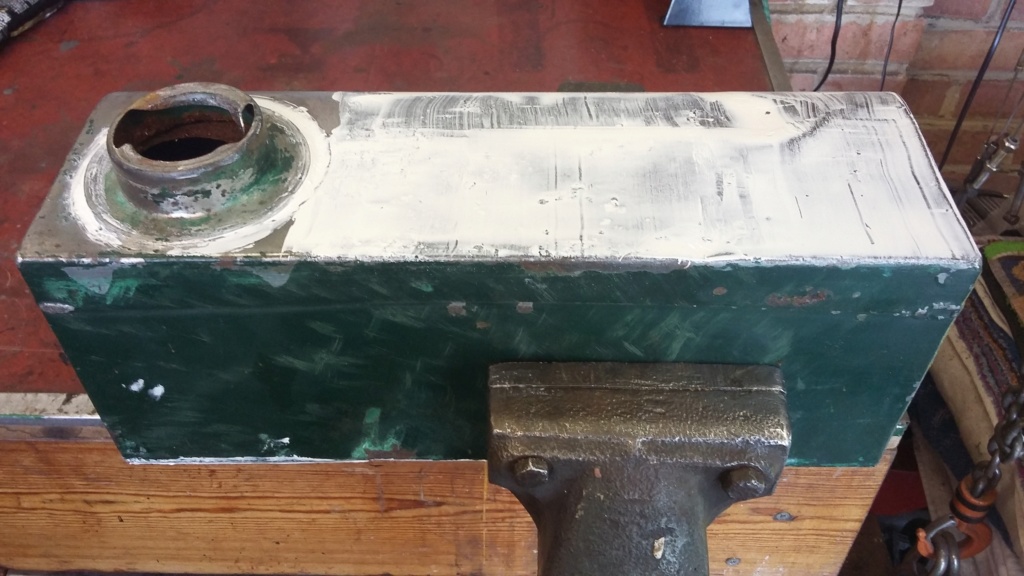
Filler applied to the top of the tank and around the filler itself, as there was a large gap all around the flange, where the solder had failed.
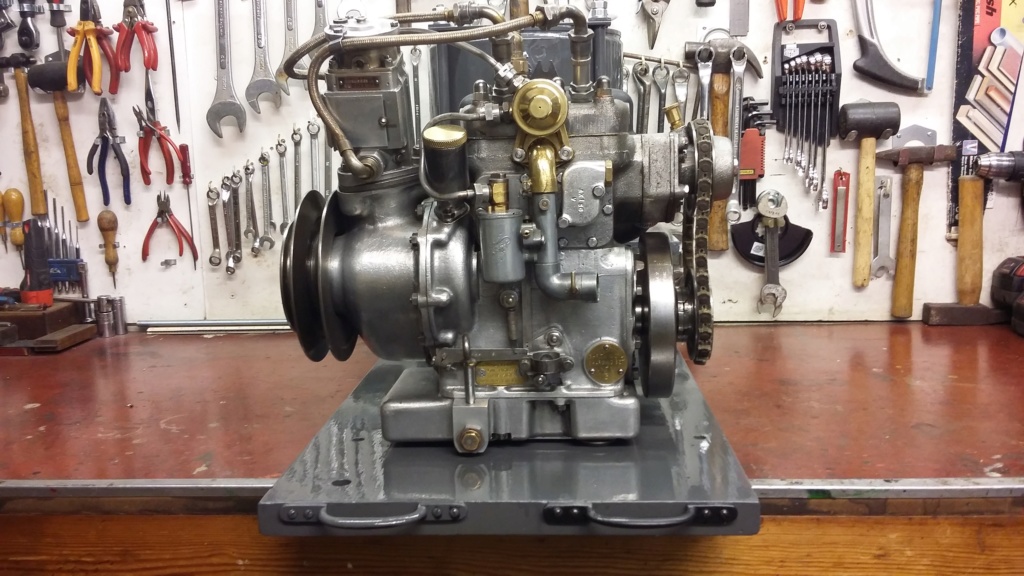
A quick look at the mystery engine that has been distracting me!
What I have managed to undertake is the repair to the Lister D petrol tank. I had thought I would follow the suggestion of soldering a sheet of tin, over the rusted out area on the base of the tank. However when I looked into it, I wasn't convinced that my large iron would be up to the job. Also I didn't have any suitable material, apart from old bean cans, I also discovered that there were rust holes in the top of the tank, as well as those in the bottom, the repair of which would have been very visible.
Instead of the soldered repair I have decided to use a filler. I had bought some POR 15 Patch Filler and Seam Sealer, to repair the fuel tank on the Jowett (Scott) generating set with good results. I was pleased to find that the tube was still soft, although it had been opened and used on the other tank over a year ago. I applied the sealer as best as I could, remembering that once this stuff goes off, it is as hard as the proverbial nail. It has to be applied to a totally dry surface and must be allowed to fully cure for up to 96 hours before it is used. Once it is cured, it is impervious to almost anything and can be smoothed down but is very hard, so do not expect to be able to rub it down as you would a normal filler, so you need to get as smooth as possible when applying it in the first place.

The rusted through tank base

Filler applied to the tank base.

First attempt at smoothing the filler down. Note the large crease caused by over tightening (not by me!) the tank straps.

Filler applied to the top of the tank and around the filler itself, as there was a large gap all around the flange, where the solder had failed.

A quick look at the mystery engine that has been distracting me!
neil (LE)- A credit to the forum

- Posts : 398
Join date : 2012-03-21
Age : 68
Location : N/W Kent
 Re: Lister H4 Pump Disassembly
Nice to see it back together Neil even nicer to see it pumping
tony RA- A credit to the forum

- Posts : 278
Join date : 2013-11-16
Age : 77
Location : newtown powys
 Re: Lister H4 Pump Disassembly
Tony, thanks for your feedback and encouragement to get it finished! I don't know about others but I seem to need an end date to get me to focus on completion. Without the imperative of an engine rally date or an event in the calendar, I lack the motivation to get over the project finish line and of course there are no dates in this year's calendar. At least your comment encouraged me take the covers off the engine and pump today, to take a look and to consider what is needed to fully finish the set up. The last areas on the pump's mechanical side to complete, are to press the gear back onto the pulley drive shaft, followed by the fitting of the modified pump washers, hopefully they will work, then there is just a few gaskets to be cut and fitted to the pump top and end castings.
Then the last major hurdle to be overcome is the fitting of the out-rigger drive shaft bearing steady. I need to devise a method to be able to mount the bearing steady casting, possibly cantilevered from the trolley, without it looking too Heath Robinson. I would also like to know if it is absolutely essential to fit the steady, or would it be reasonable to operate the pump without it in place, when pumping low volumes of water for display purposes.
The Lister D is complete apart from the tank which has now been primed and just needs to be undercoated and top coated, ready for final fitting. Then the only other outstanding item on the engine side, which is similar issue to the bearing steady, is the fitting of the fast and loose belt slide casting. Rather like the steady, I will have to design a method to mount the slide, in a reasonable way, so the belt will take the drive from the engine pulley and allow it to align with the pump fast and loose pulleys.
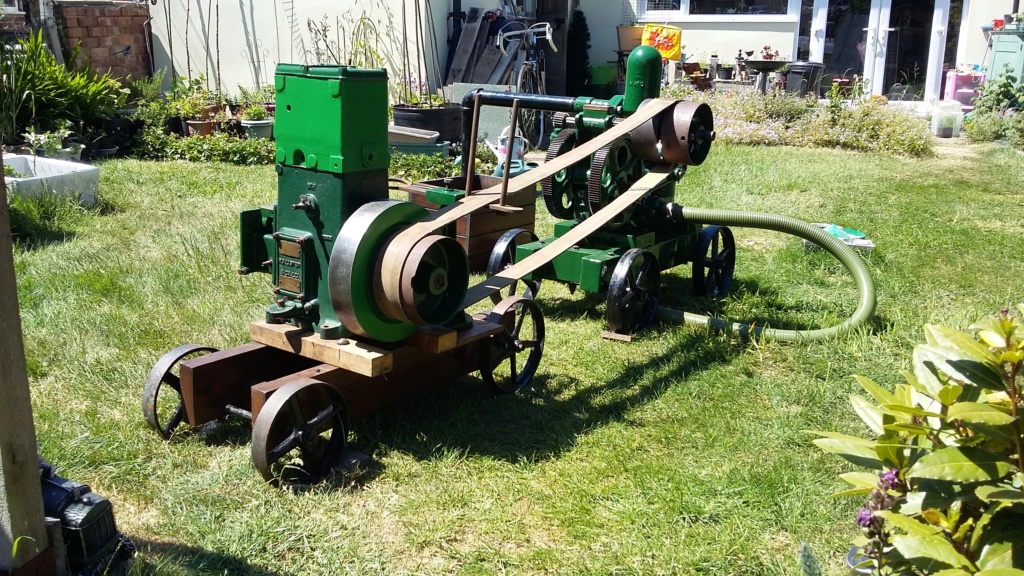
The test run of the engine and pump set up, showing how the fast and loose pulley slide is fixed to the engine trolley and how far the drive shaft extends out from the pump which the steady needs to support.
Then the last major hurdle to be overcome is the fitting of the out-rigger drive shaft bearing steady. I need to devise a method to be able to mount the bearing steady casting, possibly cantilevered from the trolley, without it looking too Heath Robinson. I would also like to know if it is absolutely essential to fit the steady, or would it be reasonable to operate the pump without it in place, when pumping low volumes of water for display purposes.
The Lister D is complete apart from the tank which has now been primed and just needs to be undercoated and top coated, ready for final fitting. Then the only other outstanding item on the engine side, which is similar issue to the bearing steady, is the fitting of the fast and loose belt slide casting. Rather like the steady, I will have to design a method to mount the slide, in a reasonable way, so the belt will take the drive from the engine pulley and allow it to align with the pump fast and loose pulleys.

The test run of the engine and pump set up, showing how the fast and loose pulley slide is fixed to the engine trolley and how far the drive shaft extends out from the pump which the steady needs to support.
neil (LE)- A credit to the forum

- Posts : 398
Join date : 2012-03-21
Age : 68
Location : N/W Kent
 Re: Lister H4 Pump Disassembly
Hi, thought I would provide an update on the progress on the H4 pump. As I mentioned in the last post, one of the final item to be completed was the fitting of the "modified" pump valve washers. As I had previously had to enlarge the centre holes, due to them having been manufactured with the wrong sized holes, I hoped I would be able to easily complete their fitting. However when I came to install them, I noticed the new items were deeper than the originals, which initially I didn't worry too much about. That was until I placed one in the valve cage with the top retainer fitted, I then realised that the increase in thickness meant there was very little lift available. I was concerned the lack of lift would reduce the ability of the valve to pass the correct amount of water. This in turn could cause an increase in back pressure, which I felt might ultimately cause damage to the valve assembly, as you cannot compress water, so something might have to give. Due to these concerns I have reverted to the original items, which although not perfect, I felt they would be better than risking using the new ones. I have selectively fitted the used items, such that the best of the originals are in the less accessible locations, allowing the worst ones to be more easily changed, if I am able to source correctly sized items in the future. As they say, one step forward, followed by three steps back!
Having completed the fitting of the valve rubbers, I moved on to making and fitting the gaskets for the valve and end covers, allowing for all the covers to be properly fitted, hopefully for the final time.
The final task to be undertaken today, was to refit the small pinion gear on the end of the drive pulley shaft. This was achieved quiet easily with the pinion gear pressed onto the shaft, allowing approximately 10 thou clearance, with the Gib head key driven home.
I know I've said it before but I'm getting there.
Neil

New washer placed against original item, demonstrating the increase in the depth from 7/16" to 9/16"

Original rubber fitted in valve chamber identifying the lift available, which would be reduced if the deeper rubber valves were fitted.

End plate with gasket and sealant applied, waiting to be fitted.
Having completed the fitting of the valve rubbers, I moved on to making and fitting the gaskets for the valve and end covers, allowing for all the covers to be properly fitted, hopefully for the final time.
The final task to be undertaken today, was to refit the small pinion gear on the end of the drive pulley shaft. This was achieved quiet easily with the pinion gear pressed onto the shaft, allowing approximately 10 thou clearance, with the Gib head key driven home.
I know I've said it before but I'm getting there.
Neil

New washer placed against original item, demonstrating the increase in the depth from 7/16" to 9/16"

Original rubber fitted in valve chamber identifying the lift available, which would be reduced if the deeper rubber valves were fitted.

End plate with gasket and sealant applied, waiting to be fitted.
neil (LE)- A credit to the forum

- Posts : 398
Join date : 2012-03-21
Age : 68
Location : N/W Kent
 Re: Lister H4 Pump Disassembly
Hi all, I said I was getting there and I've now got there. Today saw water being pumped from the Lister (Goodwin) H4 pump, being driven by the Lister "D" engine. It wasn't perfect and certainly lacked the pressure and therefore volume and flow that I remember it having. Initially I hadn't remembered that the air vessel wasn't tightened up fully, so I was hopeful once I had realised that and had fully nipped those up, all might be better but unfortunately this did not prove to be the case.
To prime the pump, I had inverted the outlet pipe and poured water in the end, a method that had proved successful previously, even causing a massive gush of water to be expelled upwards, as you swung the pipe back around. In this case it only resulted in a minor glug of water which only just about continued to flow once the pipe was turned back down. What I'm uncertain about, is if there is a preferred method to purge the air out of the system and to prime it. Or is it more likely I still have issues with the valve rubbers or the gland packing? I suppose I will only be able to determine through trial and error, unless someone knows of a foolproof way of setting up this type of pump.
Neil.
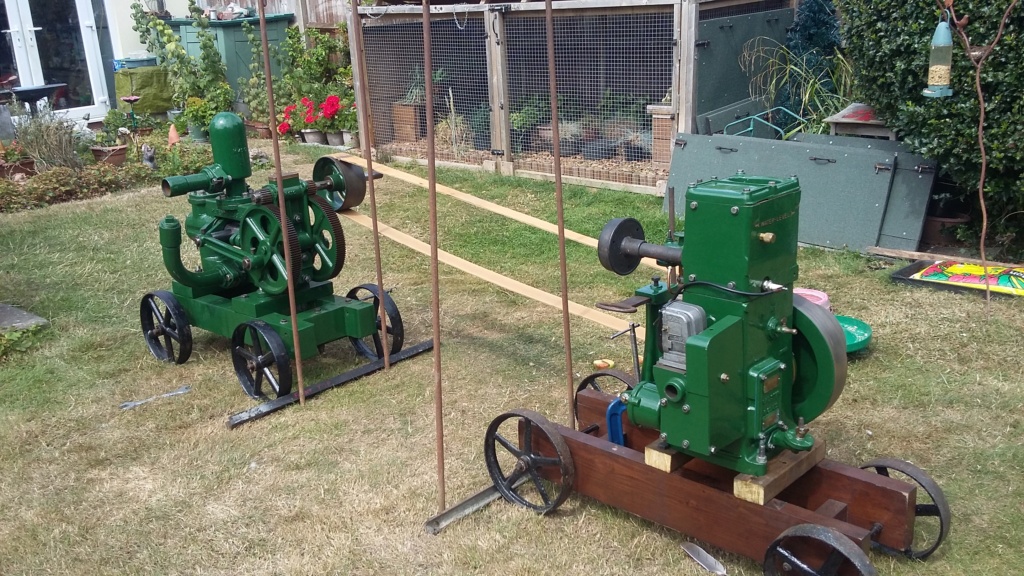
Setting the pump and engine up. Stakes being used to hold the units in place and to maintain the tension on the belt.

First water to flow from the pump for many years. The pump was primed by pouring water into the upturned outlet pipe. Is that an acceptable method?
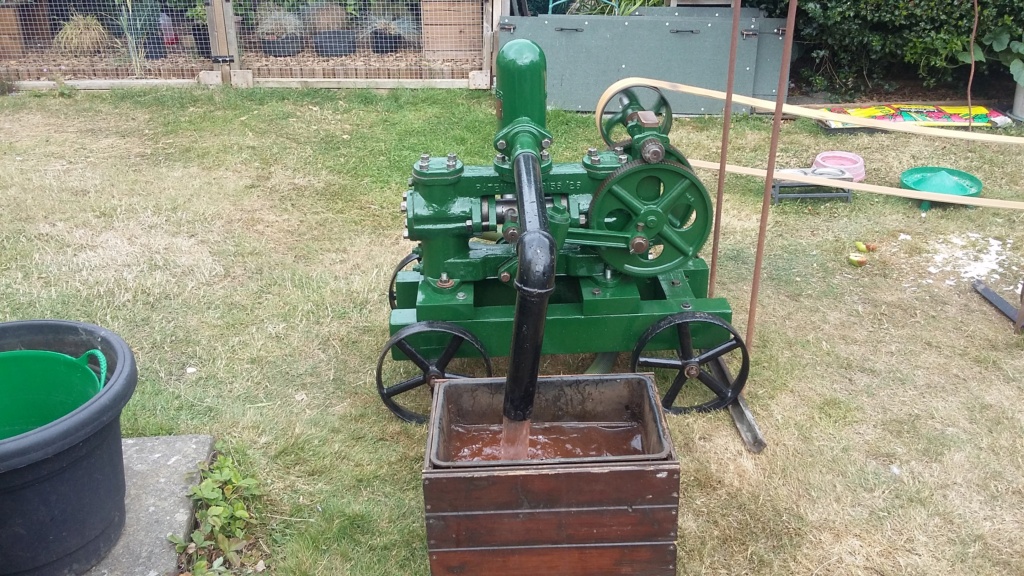
Pump working at full flow, although not as impressive as I was hoping it would be!
To prime the pump, I had inverted the outlet pipe and poured water in the end, a method that had proved successful previously, even causing a massive gush of water to be expelled upwards, as you swung the pipe back around. In this case it only resulted in a minor glug of water which only just about continued to flow once the pipe was turned back down. What I'm uncertain about, is if there is a preferred method to purge the air out of the system and to prime it. Or is it more likely I still have issues with the valve rubbers or the gland packing? I suppose I will only be able to determine through trial and error, unless someone knows of a foolproof way of setting up this type of pump.
Neil.

Setting the pump and engine up. Stakes being used to hold the units in place and to maintain the tension on the belt.

First water to flow from the pump for many years. The pump was primed by pouring water into the upturned outlet pipe. Is that an acceptable method?

Pump working at full flow, although not as impressive as I was hoping it would be!
neil (LE)- A credit to the forum

- Posts : 398
Join date : 2012-03-21
Age : 68
Location : N/W Kent
 Re: Lister H4 Pump Disassembly
If the water is pulsing then the pump valves are at fault, I doubt it the gland packings as the worse they can do is leak. You will see that most people will prime by filling the inlet, is your inlet bigger or smaller than the outlet.
Maryalice
Maryalice
maryalice- Life Member

- Posts : 1235
Join date : 2010-01-23
Age : 70
Location : Bedfordshire
 Re: Lister H4 Pump Disassembly
With a big old slow piston pump like an H4 you will get a pulse in the water if the outlet is the same size as the inlet as there is nothing to make the air vessel work, the air vessel works by being full of air and when the unit is fitted "on site" the extra pipe work will give you a head of water to push against, this in turn will force some water into the air chamber and as the piston pushes the water more is forced into the air chamber by the restrictive forces of the pipe work, that way the air takes the "pulse" out of the supply and you don't get "water hammer". With your pump you probably would need to come down at least 2 pipe sizes on the outlet to have a smooth flow from the delivery pipe. This would also help with the valves seating on the cages.

Appletop- Life Member

- Posts : 1479
Join date : 2010-01-02
Age : 56
Location : Just outside Diss
maryalice- Life Member

- Posts : 1235
Join date : 2010-01-23
Age : 70
Location : Bedfordshire
 Re: Lister H4 Pump Disassembly
Hi sorry had written a reply, then went to read the latest post and lost it! Thanks anyway for the information. I am using the same set up as before and although the pump certainly did work better before it was laid up for 20 years, it was not perfect. So I will try to introduce a reducer in the outlet pipework, to provide some back pressure for he air chamber to have something to operate against. There isn't any indication of water leaking around the piston and the gland packing, so in reality there isn't that much more that can be at fault, apart from the valves themselves and if the back pressure helps them to operate properly, perhaps the reducer could solve all the problems. Not certain how or when I'll be able to fit new pipework or some form of reducer but hopefully it won't be too long before I have it operating correctly.
Neil
Neil
neil (LE)- A credit to the forum

- Posts : 398
Join date : 2012-03-21
Age : 68
Location : N/W Kent
 Re: Lister H4 Pump Disassembly
get a lump of wood, turn a taper to fit your pipe and drill a hole in the plug before you change pipework.
Maryalice
Maryalice
maryalice- Life Member

- Posts : 1235
Join date : 2010-01-23
Age : 70
Location : Bedfordshire
 Re: Lister H4 Pump Disassembly
The simple ideas are often the best ones! I've got a large tapered rubber bung which I could bore a hole through, I might try that, cheers.
Neil
Neil
neil (LE)- A credit to the forum

- Posts : 398
Join date : 2012-03-21
Age : 68
Location : N/W Kent
 Re: Lister H4 Pump Disassembly
Thanks for sharing, there’s a lot to read 

Andywaters- Life Member

- Posts : 609
Join date : 2021-09-15
Age : 66
 Re: Lister H4 Pump Disassembly
Hi Neil
I noticed here that you assembled the valve open washers with the flat side to the rubber. All of mine on the HI had the convex face against the washer and the flat side under the nut. I think the idea is that the washer holds the valve rubber down but allows it to curl up under water pressure.

I noticed here that you assembled the valve open washers with the flat side to the rubber. All of mine on the HI had the convex face against the washer and the flat side under the nut. I think the idea is that the washer holds the valve rubber down but allows it to curl up under water pressure.


Andywaters- Life Member

- Posts : 609
Join date : 2021-09-15
Age : 66
 Re: Lister H4 Pump Disassembly
I think mine are the wrong way up 🧐
Edit
A friend who has spares confirms mine are wrong

Edit
A friend who has spares confirms mine are wrong


Andywaters- Life Member

- Posts : 609
Join date : 2021-09-15
Age : 66
 Re: Lister H4 Pump Disassembly
Thanks for taking the time to comment. I wouldn't have been certain which was correct, I imagine I just copied what was there when I took it apart. I really must get back to the pump and the "D" at some point, as they have not been properly finished. I have been distracted with the Scott recently which has been taking a little longer than perhaps it should!
neil (LE)- A credit to the forum

- Posts : 398
Join date : 2012-03-21
Age : 68
Location : N/W Kent
 Re: Lister H4 Pump Disassembly
Well your thread saved me from rebuilding mine wrong thanks

Andywaters- Life Member

- Posts : 609
Join date : 2021-09-15
Age : 66
Page 6 of 6 •  1, 2, 3, 4, 5, 6
 Similar topics
» Lister 'd' to lister domestic pump
» Lister Domestic Pump
» lister h3 pump
» Lister H3 pump
» Lister H1 pump nut
» Lister Domestic Pump
» lister h3 pump
» Lister H3 pump
» Lister H1 pump nut
Page 6 of 6
Permissions in this forum:
You cannot reply to topics in this forum|
|
|

