
Bamfords SV 5hp (yet another project, they seem to be getting bigger!)
Page 1 of 2 • 1, 2 ![]()

Bamfords SV 5hp (yet another project, they seem to be getting bigger!)
![]() by nutgone Thu May 23 2013, 14:27
by nutgone Thu May 23 2013, 14:27
It's a Bamfords SV 5hp, I believe it's known as an SV3, even though it's 5hp. I really don't know what I'm doing with this, I only bid on it, going up in £1 or 50p increments to see what the highest bid was, fully expecting to be out-bid in the last 6 hours of the auction, it wasn't to be. So I ended up with it.
Here's a few pics (difficult to get decent pics where it is)....


It turns over, but is far from any sort of running order. Dunno when I'm going to get started on it, I am even considering just letting it go as it is. It might be a bit too big for me, & it needs a lot of work.
I've had the rocker cover off & wasn't impressed. I will have to take a look inside the crank case first, & see what sort of state things are in.
Last edited by nutgone on Thu May 30 2013, 16:02; edited 1 time in total (Reason for editing : Changed Title)
_________________
The "F" key is dying on my computer, please remember this when reading my posts, I'm trying to avoid using it.
The name's Matt, but call me Nutts if you like, there's already enough Matt's about.

nutgone- Life Member

- Posts : 2356
Join date : 2012-07-04
Age : 44
Location : East Sussex
Re: Bamfords SV 5hp (yet another project, they seem to be getting bigger!)
![]() by Biggusdannus Thu May 23 2013, 14:59
by Biggusdannus Thu May 23 2013, 14:59

Biggusdannus- A credit to the forum
- Posts : 186
Join date : 2012-09-16
Re: Bamfords SV 5hp (yet another project, they seem to be getting bigger!)
![]() by Lewis MacRae Thu May 23 2013, 15:56
by Lewis MacRae Thu May 23 2013, 15:56
_________________
Lewis
 , x2 Lister D, x1 IHC LAA, x1 Lister L, x1 Wolseley WDII, x1 Amanco Chore Boy, x1 Fairbanks Morse Z 3 HP, x1 Crossley 1030?
Lewis MacRae- Admin
- Posts : 699
Join date : 2012-11-02
Location : Inverness, Scotland
Re: Bamfords SV 5hp (yet another project, they seem to be getting bigger!)
![]() by Biggusdannus Thu May 23 2013, 15:58
by Biggusdannus Thu May 23 2013, 15:58
Biggusdannus- A credit to the forum
- Posts : 186
Join date : 2012-09-16
Re: Bamfords SV 5hp (yet another project, they seem to be getting bigger!)
![]() by nutgone Thu May 23 2013, 17:27
by nutgone Thu May 23 2013, 17:27
Not sure when I'm going to get a chance to even start on this one. The Stuart is almost there & going on eBay this weekend, so that won't be taking up any more of my time, The next one to really get cracking on is the Lister A, so I will probably start to look into this one as I am working on that. But I really need the Stuart out first as I'm running out of room.
I have never even touched a Bamfords engine before, so this one will be another steep learning curve.
_________________
The "F" key is dying on my computer, please remember this when reading my posts, I'm trying to avoid using it.
The name's Matt, but call me Nutts if you like, there's already enough Matt's about.
nutgone- Life Member
- Posts : 2356
Join date : 2012-07-04
Age : 44
Location : East Sussex
Re: Bamfords SV 5hp (yet another project, they seem to be getting bigger!)
![]() by Hughesy Thu May 23 2013, 21:15
by Hughesy Thu May 23 2013, 21:15
Shame its got in such a state. I didnt see it for sale otherwise might have had ago myself.
If you dont mind me asking what did you pay for it.
Lewis
_________________
16 And Restoring Engines
Hughesy- A credit to the forum
- Posts : 366
Join date : 2010-03-06
Age : 30
Location : Cambridge
Re: Bamfords SV 5hp (yet another project, they seem to be getting bigger!)
![]() by kevjhnsn Thu May 23 2013, 22:11
by kevjhnsn Thu May 23 2013, 22:11
that will keep you busy for aa while then nutts matenutgone wrote:Well, I dropped a few hints some time ago on one of my other threads, so here she is, my new secret project.
It's a Bamfords SV 5hp, I believe it's known as an SV3, even though it's 5hp. I really don't know what I'm doing with this, I only bid on it, going up in £1 or 50p increments to see what the highest bid was, fully expecting to be out-bid in the last 6 hours of the auction, it wasn't to be. So I ended up with it.
Here's a few pics (difficult to get decent pics where it is)....
It turns over, but is far from any sort of running order. Dunno when I'm going to get started on it, I am even considering just letting it go as it is. It might be a bit too big for me, & it needs a lot of work.
I've had the rocker cover off & wasn't impressed. I will have to take a look inside the crank case first, & see what sort of state things are in.
kev
_________________
" IF YOU DONT DO ANYTHING " "" YOU'LL NEVER MAKES MISTAKES "" 
kevjhnsn- Life Member
- Posts : 3596
Join date : 2011-02-10
Age : 45
Location : south cheshire
Re: Bamfords SV 5hp (yet another project, they seem to be getting bigger!)
![]() by nutgone Thu May 23 2013, 22:27
by nutgone Thu May 23 2013, 22:27
Hughesy wrote:That is a very nice engine.
Shame its got in such a state. I didnt see it for sale otherwise might have had ago myself.
If you dont mind me asking what did you pay for it.
Lewis
I think I put in a bid of up to £49.50 & it sold for £49.
TBH I didn't realise just how rough it was, but I can't complain, as I didn't bother to view it & there was nothing wrong with the description. But it was still a good price. I fully expected it to sell for a fair bit more, & expected the bidder behind me to up my bid by 50p. If they had done they would've won it.
I blame Mark!
He told me it would go for more, so with over 6 hours to go I decided to "have a look" & see what the top bid was. Oh well, it's home now, nicely covered up & my mum hasn't even spotted it!
I will have a good tinker when the Stuart Turner is out the way.
_________________
The "F" key is dying on my computer, please remember this when reading my posts, I'm trying to avoid using it.
The name's Matt, but call me Nutts if you like, there's already enough Matt's about.
nutgone- Life Member
- Posts : 2356
Join date : 2012-07-04
Age : 44
Location : East Sussex
Re: Bamfords SV 5hp (yet another project, they seem to be getting bigger!)
![]() by Stamford24 Fri May 24 2013, 10:41
by Stamford24 Fri May 24 2013, 10:41
nutgone wrote:
I blame Mark!
He told me it would go for more, so with over 6 hours to go I decided to "have a look" & see what the top bid was. Oh well, it's home now, nicely covered up & my mum hasn't even spotted it!

I will have a good tinker when the Stuart Turner is out the way.
Yep BLAME ME
Even the vendor expected it to make more. In fact with fees he said he'd lost money on it. Its a pretty engine, not too big but lumpy enough. Compare it to a Lister L and its much smaller and less common. Once you get into it Matt, it'll be OK. At least its got a nice thick coating of grease on it which has protected quite a bit, could be far worse
Stamford24- A true Stationary engine owner
- Posts : 152
Join date : 2013-01-27
Re: Bamfords SV 5hp (yet another project, they seem to be getting bigger!)
![]() by Guest Fri May 24 2013, 11:53
by Guest Fri May 24 2013, 11:53
These are a lovely engine would have loved one myself but there just to heavy for me, even the small ones.
Looking forward to this resto, good luck,
Stu.
Guest- Guest
Re: Bamfords SV 5hp (yet another project, they seem to be getting bigger!)
![]() by nutgone Wed May 29 2013, 23:21
by nutgone Wed May 29 2013, 23:21
So, off came the carb & the exhaust....

& off with it's head!....

These bits came off with surprising ease, maybe due to my spraying with my home made parts cleaner/easing oil solution last week, maybe due to being caked in oil for so many years, (but it was all very dry in the rocker box). I just hope the flywheels will come off as easy.
I also removed the governor mechanism, just leaving the weights (now unbolted from the flywheel, but not removed as the flywheel kinda gets in the way, but they are loose & moving).
My next job was to try & split the crank case, I'm guessing you just remove the 4 main bolts, but I've done this (also removing the magneto chain guard in the process, which also came away without a fight) but I can't get the crank case to separate. I have removed the hinge pin, hoping to split it from that side, but I'm not so sure this is such a good idea.
Anyway, it was late in the afternoon, it was beginning to rain & I had to take the dogs for a walk. Also, my mum was due back from work, so it was best to cover it up again (although I'm sure she wouldn't know one lump of iron from another, sometimes she can surprise you).
My main problem here is room to work on it, I just haven't got any. But I would like to get the crank case opened up to see if the pushrods are in there (because they're not where they should be). Then, I can remove any small parts & get them inside for cleaning.
The Lister A is my main next project, but this project is also going to be running alongside it (you know what I'm like, I like to have a few on the go at once, just in case one of them hits a snag or for those inevitable gaps you get when paint is drying or you're waiting for some part to arrive). I just want to know what I'm up against before I really get cracking. So I need that crank case opened.
I will also need to remove the massive pulley & both the flywheels (probably) at some point.
I'm guessing that when the crank case splits the crank shaft & all it's bits moves with the top section??? Can anyone confirm this please? If it stays with the bottom part then the piston must come out.
Am I doing anything wrong here or am I along the right lines? (I'm just following my nose with this one, but this engine is very heavy, so I don't want to make any mistakes & end up damaging myself or (even worse) the engine!)
Also, the carb. I think it's had it. Anyone know what model it is? It looks pretty much like any stationary engine Solex carb from this era, what might fit? Any ideas anyone???
Will get some more detailed pics tomorrow, if the weather is kind to me.
_________________
The "F" key is dying on my computer, please remember this when reading my posts, I'm trying to avoid using it.
The name's Matt, but call me Nutts if you like, there's already enough Matt's about.
nutgone- Life Member
- Posts : 2356
Join date : 2012-07-04
Age : 44
Location : East Sussex
Re: Bamfords SV 5hp (yet another project, they seem to be getting bigger!)
![]() by nutgone Thu May 30 2013, 16:23
by nutgone Thu May 30 2013, 16:23


The sad news is there is no sign of the pushrods
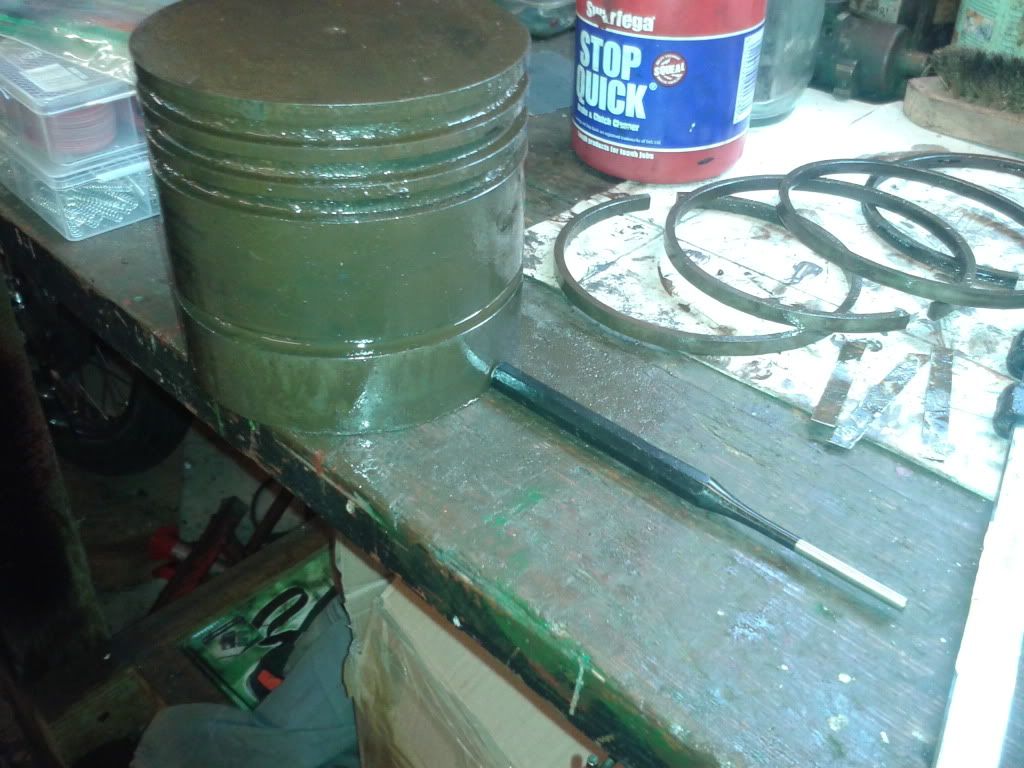
I also managed to split the big end & get the piston out....

The rings look OK, the oil scraper is intact & moving, the 3 compression rings are intact but are all at various stages of stuck'ness (I know it's not a real word!
I'm not sure if I'm going to remove the flywheels on this one, I'm certainly not planning on trying very hard as there's very little need to. As long as I can get the pulley off I should be able to clean & paint everything up OK. But, if I can't get the governor collar moving on the shaft I might have to remove at least that one.
Here's some pics o the stuff I got off yesterday....
The carb....

Rather strange & very simple governor linkage....
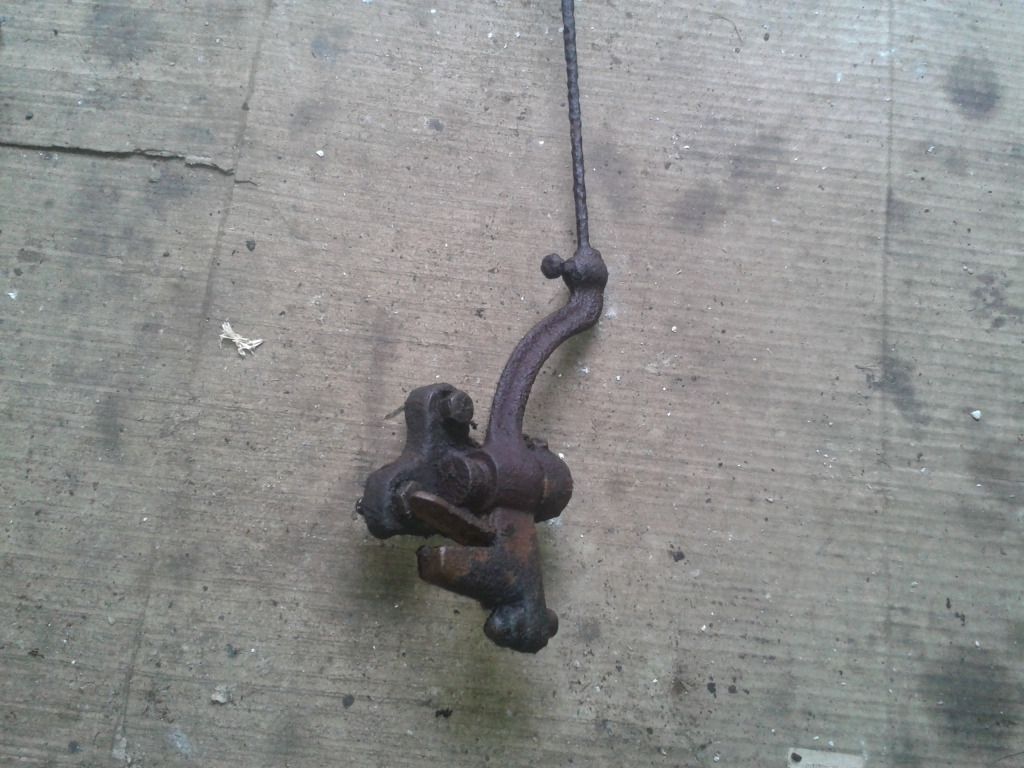
& the cast iron magneto chain guard....


There is very little wear on this engine, the gear teeth inside show practically no wear (not unusual on such a slow revving engine) & there is no discernible lip at the top of the bore. There is also very little (if any) play on the main bearings (which are 2 part shells anyway, so could be scraped) & the big end seems to be in pretty good shape as well.
Now I must get on with the Lister!
_________________
The "F" key is dying on my computer, please remember this when reading my posts, I'm trying to avoid using it.
The name's Matt, but call me Nutts if you like, there's already enough Matt's about.
nutgone- Life Member
- Posts : 2356
Join date : 2012-07-04
Age : 44
Location : East Sussex
Re: Bamfords SV 5hp (yet another project, they seem to be getting bigger!)
![]() by nutgone Thu May 30 2013, 16:29
by nutgone Thu May 30 2013, 16:29
https://s1316.photobucket.com/user/Nutgone1/library/Stationary%20Engine%20Projects/Bamfords%20SV3%205hp
Many of the pics are to help me remember how it goes back together, I only ever put the choice few in these posts (usually).
_________________
The "F" key is dying on my computer, please remember this when reading my posts, I'm trying to avoid using it.
The name's Matt, but call me Nutts if you like, there's already enough Matt's about.
nutgone- Life Member
- Posts : 2356
Join date : 2012-07-04
Age : 44
Location : East Sussex
Re: Bamfords SV 5hp (yet another project, they seem to be getting bigger!)
![]() by mm5aho Thu May 30 2013, 16:58
by mm5aho Thu May 30 2013, 16:58
Only wish I had more time to spend tinkering like that!
What's the brass tube sticking out the big end? Is that an oil pickup for bigend?
The carb looks like a lot of its substance has gone back to mother nature. (Iron ore)
Guessing from the picture it might be a 3" bore and about 3" stroke (about 350cc??)
_________________
Geoff
mm5aho- Expert

- Posts : 81
Join date : 2013-02-23
Age : 66
Location : West Lothian
Re: Bamfords SV 5hp (yet another project, they seem to be getting bigger!)
![]() by nutgone Thu May 30 2013, 17:01
by nutgone Thu May 30 2013, 17:01
Piston rings are now all off with no breakages!

_________________
The "F" key is dying on my computer, please remember this when reading my posts, I'm trying to avoid using it.
The name's Matt, but call me Nutts if you like, there's already enough Matt's about.
nutgone- Life Member
- Posts : 2356
Join date : 2012-07-04
Age : 44
Location : East Sussex
Re: Bamfords SV 5hp (yet another project, they seem to be getting bigger!)
![]() by Biggusdannus Thu May 30 2013, 17:05
by Biggusdannus Thu May 30 2013, 17:05
Biggusdannus- A credit to the forum
- Posts : 186
Join date : 2012-09-16
Re: Bamfords SV 5hp (yet another project, they seem to be getting bigger!)
![]() by nutgone Thu May 30 2013, 17:22
by nutgone Thu May 30 2013, 17:22
mm5aho wrote:Looks an interesting project, good luck with the rest of it.
Only wish I had more time to spend tinkering like that!
What's the brass tube sticking out the big end? Is that an oil pickup for bigend?
The carb looks like a lot of its substance has gone back to mother nature. (Iron ore)
Guessing from the picture it might be a 3" bore and about 3" stroke (about 350cc??)
The carb is Mazak (pot metal, monkey metal whatever you call it, look up "Pot Metal" on Wikipedia, although I expect you know full well what it is, it's interesting to see the wide variety of metals that can make their way into the mix, but it does or can contain iron, although I think it's the zinc which goes first, but don't know for sure). I might be able to get it working again, & I will try, but I expect there will be a replacement somewhere.
The brass bit on the big end is indeed an oil dipper, a hollow one which is directional, so must go back on the correct way round.
As for the size of the engine, I see you've been drawn in to the same trap as me when I bid on it. The bore is just over 4.5"!
This is bigger than a Lister A, more like a Lister B, possibly slightly bigger. The Lister A is around 700cc (I think), I will have to look it up. But the pictures certainly don't tell the full story of the size of this engine, which must be around a full litre.
_________________
The "F" key is dying on my computer, please remember this when reading my posts, I'm trying to avoid using it.
The name's Matt, but call me Nutts if you like, there's already enough Matt's about.
nutgone- Life Member
- Posts : 2356
Join date : 2012-07-04
Age : 44
Location : East Sussex
Re: Bamfords SV 5hp (yet another project, they seem to be getting bigger!)
![]() by nutgone Thu May 30 2013, 17:36
by nutgone Thu May 30 2013, 17:36
Biggusdannus wrote:The bottom end is looking a lot better than I thought it would be, keep up the good work!
Cheers Dan, it's better than I expected as well. The top end (rocker box) was dry as a bone with a couple of fist-fulls of dust, dirt & grass inside (looked like a mouse's house to me).
_________________
The "F" key is dying on my computer, please remember this when reading my posts, I'm trying to avoid using it.
The name's Matt, but call me Nutts if you like, there's already enough Matt's about.
nutgone- Life Member
- Posts : 2356
Join date : 2012-07-04
Age : 44
Location : East Sussex
Re: Bamfords SV 5hp (yet another project, they seem to be getting bigger!)
![]() by mm5aho Fri May 31 2013, 07:36
by mm5aho Fri May 31 2013, 07:36
Its hard to estimate from pictures unless there's some clear reference point. I under estimated a long way.
Yes, should have thought before typing about the carb, pretty unlikely to be steel or cast iron. Quite likely an aluminium, zinc, magnesium alloy. A quite corrodable mixture, but easily cast, and that's probably why they used it, and for many components still do use these alloys.
On engine sizes, I remember when I was young, and keen on trout fishing (in New Zealand this was), where one of the fishing rangers had a clinker built dinghy, about 12-14 ft, with an inboard single cylinder, low revving diesel with huge flywheels. But despite operating at perhaps 500 rpm, it made this dinghy fly along at about 25 knots. Surprised many people, as it would speed along, but made a noise that sounded like a truck idling. An inventive way to use such an engine. Maybe it was similar size to your latest toy.
_________________
Geoff
mm5aho- Expert
- Posts : 81
Join date : 2013-02-23
Age : 66
Location : West Lothian
Re: Bamfords SV 5hp (yet another project, they seem to be getting bigger!)
![]() by nutgone Fri May 31 2013, 10:41
by nutgone Fri May 31 2013, 10:41
Bamfords used this basic design shape for a lot of different sized engines (as I have now learned), I thought this was one of the little ones, about the size of a Lister D, when I bought it. Oops!
Anyway, little bit of an update. Last night I managed to get the carb completely dismantled. A couple of the smaller steel bits are almost rusted away but the main carb should be functional again without too much work. It's surprisingly good inside. It wasn't easy to get apart though. There's also a broken brass piece which I will have to solder up, but it's going to be a bit tricky to do so, I might need to invest in one of those little pencil torches (I had one once & thought it was rubbish, but that was a long time ago).
I've also dismantled the cylinder head (valves & springs out, rockers & rocker shaft out) & it all seems to be in pretty good nick. I haven't checked the valve guides for play yet, but I'm not too bothered about them on an engine of this size. Things like that can get pretty sloppy on these old engines before they have any kind of detrimental effect on running. I think they're OK anyway, there didn't seem to be much movement when I took the valves out.
I'll see about getting some more pics on the album today.
_________________
The "F" key is dying on my computer, please remember this when reading my posts, I'm trying to avoid using it.
The name's Matt, but call me Nutts if you like, there's already enough Matt's about.
nutgone- Life Member
- Posts : 2356
Join date : 2012-07-04
Age : 44
Location : East Sussex
Re: Bamfords SV 5hp (yet another project, they seem to be getting bigger!)
![]() by Guest Fri May 31 2013, 11:41
by Guest Fri May 31 2013, 11:41
Stu.
Guest- Guest
Re: Bamfords SV 5hp (yet another project, they seem to be getting bigger!)
![]() by nutgone Fri May 31 2013, 11:55
by nutgone Fri May 31 2013, 11:55
The exhaust is partly there (original Bamford one) but missing it's front plate, but I saw an old copy of the Stationary Engine Magazine for sale on eBay with a picture of one of these on the front & it quite clearly shows the exhaust, so I have something to work from.
It's funny, but this engine is almost more of a viable project to me than the Lister A. The Lister needs magneto, tanks & piston rings, the Bamford needs magneto, tanks & push rods.
The piston rings seem fine on this one, they all came off with a little patience & some of my magic "piston ring" spray (mixture of ATF & Methylated Spirit, which should be ATF & acetone, but I didn't have any acetone). They fit their grooves very nicely (haven't checked the end gaps yet, but they should be OK, especially as there's 3 of them plus oil scraper).
I'm almost tempted to shelve the Lister & get on with this one, if only it didn't mean more cleaning! The Lister is pretty much cleaned now, except the crank case which is filled with the special absorbent granules (OK, so it's cat litter, but it's special cat litter
Anyway, onwards & upwards. I'd better get out there & have a tidy up.
_________________
The "F" key is dying on my computer, please remember this when reading my posts, I'm trying to avoid using it.
The name's Matt, but call me Nutts if you like, there's already enough Matt's about.
nutgone- Life Member
- Posts : 2356
Join date : 2012-07-04
Age : 44
Location : East Sussex
Re: Bamfords SV 5hp (yet another project, they seem to be getting bigger!)
![]() by nutgone Sun Jun 02 2013, 18:13
by nutgone Sun Jun 02 2013, 18:13

It was my dad's Velocette MAC (350cc 4 stroke OHV). After performing well the last time he took it out (last weekend) he bought it out to take a quick trip down to Eastbourne (the bike's cheaper than a car & a useful way to beat the traffic) it wouldn't start, it seems it had magically lost it's compression???
So, we set to dismantling it. Head, barrel & piston off, good de-coke, very light lap-in of the valves (basically a top end rebuild) & she was back running again (OK, so I make it sound easy, it wasn't done until Saturday afternoon)....

Now I thought I would set my sights on rebuilding another cylinder head, only this one was slightly larger....

Basically the valves aren't too bad. The inlet valve is perfect, as is the seat (a very thin contact band, less than 1/8"), but the exhaust valve is quite badly pitted. Really it needs to be re-faced, but it's borderline, so I went at it with the valve grinding paste instead & I think it's just about passable now.
I've got some pics but I can't remember which are which. I think this is both valves during the grinding process....

& here's both o them (separately) after I'd finished (literally a minute or two on the inlet, but the exhaust was a lot more, I even cracked open the coarse paste)....
Inlet....

Exhaust....

The seats got a quick re-cut, which was more of a tidy-up really (Mark, I've still got your valve seat cutters, remind me next time you're round)....
Inlet....

Exhaust (slightly porous seat, but should work)....

You may think it's a bit early to grind the valves in, but I like to grind valves first, as that way any left over paste will get washed away during the cleaning process. The worst thing to do with paste is to rinse it first, I always wipe it off first with some rag, then rinse down afterwards, you really don't want that stuff in your engine, especially not in the valve guides, so having the chance to do this before the major cleaning is easily the best option. I still went out of my way to clean it all off, but I used so much (what with the pitting & the fact it's such a large engine) that there's a good chance some of it will remain. The head's really dirty & grimy, so will get a good clean at some point.
I still think that exhaust valve is a bit borderline, but for a low revving old engine like this, for show use, it should be fine. If not then I can get it re-faced as I now know someone with the special valve grinding machine (apparently you're not supposed to do them on a lathe really, although you usually can, but if they are hardened or have work hardened then a lathe will struggle, & the special grinder is apparently the proper way).
_________________
The "F" key is dying on my computer, please remember this when reading my posts, I'm trying to avoid using it.
The name's Matt, but call me Nutts if you like, there's already enough Matt's about.
nutgone- Life Member
- Posts : 2356
Join date : 2012-07-04
Age : 44
Location : East Sussex
Re: Bamfords SV 5hp (yet another project, they seem to be getting bigger!)
![]() by nutgone Fri Jun 14 2013, 22:29
by nutgone Fri Jun 14 2013, 22:29

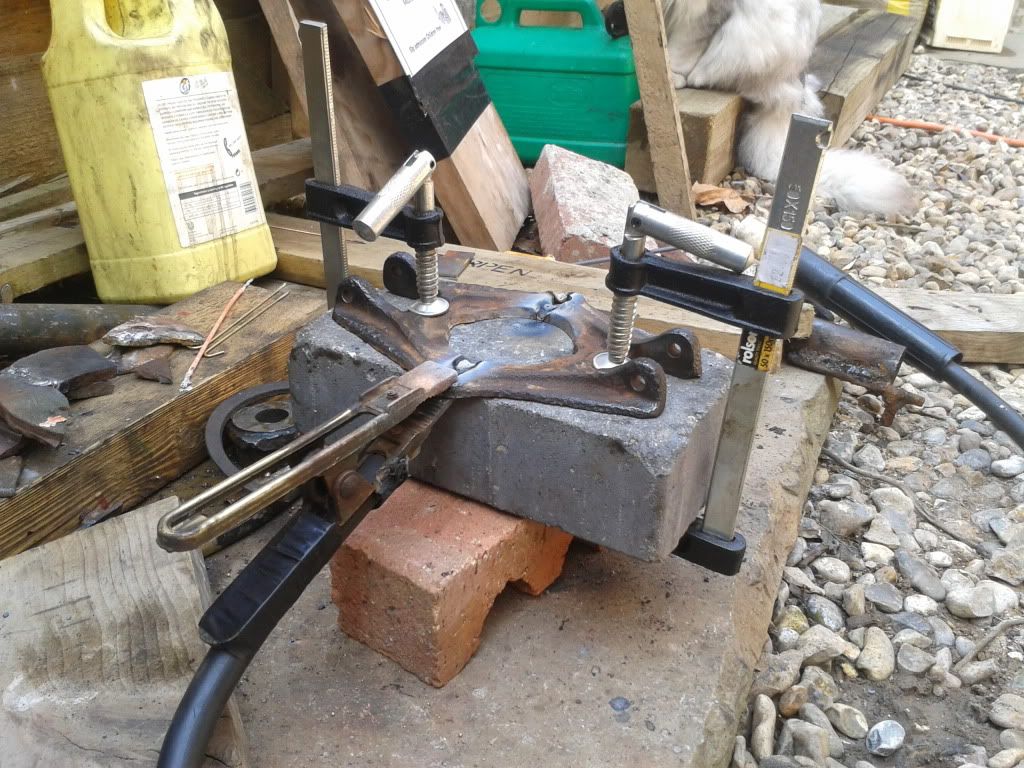
This is the piece that sits round the crank shaft & is bolted to the inside of the flywheel. Attached to it, via hinges, are the governor weights. This piece is made of very thin cast iron & I managed to break it whilst attempting to tap out the governor weight hinge spindles
So I thought I would make an attempt at some cast iron welding with my newly found arc welding skills. I bought some special (& rather expensive) cast iron welding electrodes & had a go. I could've brazed it, but I wanted a stronger join & I don't have a suitable gas torch for brazing (I have a "Mapp-Gas" torch, which claims to be man enough, but I really want oxy-acetylene or oxy-propane for cast iron brazing). My carbon arc torch is coming on nicely, but it's not reliable enough to take on a serious job like this, so arc welding it was.
I "V" grooved it & had a go at clamping it down (the pictures are all a bit jumbled up here, so some will be wrong as I forgot to take them at the right times. pics of the finished article may not actually be of the finished article, can't remember now)....

This wasn't very successful, so I tried again with some different clamps....
It wasn't easy. I had done a lot of research & some actual practise on a few different pieces of scrap cast, with differing results. My pieces of Tarpen fan belt pulley went very well, but my pieces of Stuart Turner water jacket plate mostly refused to weld (they didn't even want to braze!), so really it's a bit of a lottery with cast iron, as there is no proper set recipe & it varies from casting to casting (obviously Stuart didn't use quality cast iron, but I kind of knew that anyway). But at least I wasn't going in totally blind, & my normal arc welding is getting very good.
Here we go then
I welded one side on the outer part, then went round to do the other side, on the outer. The side I had already done immediately went "ping", so I removed the clamps, had a good swear, & ground it all off. I re-did the groove a little wider (so I would have more than one pass at each weld), watched another YouTube video on the subject, had another couple of practise goes & went at it again.
After a while I reckon I got it....


A bit low here, but I didn't think it was worth risking the heat distortion of another pass (sometimes you need to know when to stop)....

Once ground down & the holes ground through with the Dremmel (I didn't want to use a drill, too violent on new welds, especially cast iron welds) it doesn't look bad. There's no signs of cracks & it seems pretty strong & appears to have held it's shape....


I won't be able to re-fit it until I get the flywheel off on that side.
Now I need a gib key puller. If I had some plate I would make one of my own. I might go up the tractor shop & see if they'll sell me a Clauss one (I'm sure I've spelt that wrong, but you know what I mean).
As a moral to the story. Stu said he heard somewhere not to pre-heat cast iron for welding. Well, this is true for some parts & for some methods, but for most of us we should pre-heat. I certainly should have for this. But you need something hotter than your oven at home. Some people use a gas barbecue, wrapped in foil, running at full blast for a good few hours. Some people just heat the weld area until it starts to glow (this is too hot) then they get the welder ready & do the weld (by which time it has cooled sufficiently) & this is a good method. But, with pre heating it is a good idea to do it very slowly & do it in a metal pot filled with dry sand (like kids play sand or kiln dried paving sand, not just any old sand). At the very least you must allow it to cool slowly. A good way to do this is in a metal bucket & cover the piece in dry sand (same sand as above) & leave it however long it takes.
There are ways to weld cast iron without pre-heating, you have to do very very short passes & let the piece cool between passes. Also, every time you do one of these passes you must "peen" the weld. this basically means hit it with your chipping hammer lots & lots (not too heavily, but heavily enough). This releases stresses in the weld. Also, with this cold welding method, you should weld in different places each time, so one bit at one end, peen it, let it cool. Then do a bit at the other end, peen it, let it cool. These welds must be no longer then 3/4" (at the most), so this is a slow method & has no guarantees.
Even with this cold welding method the piece should be heated above normal ambient. Ideally so you can just hold onto it without burning yourself.
I didn't pre-heat this piece, but it did get hot. I think I was lucky (I didn't know much about it until after I did the job), time will tell I guess.
There's loads of info out there & some very good welders sharing their expertise. Most of the welding forums aren't very good for arc welding, they mostly see it as yesterday's technology. Sadly they are wrong, as it still very much has a place in industry & for those of us on a budget it is the only way we can weld.
I am saving my pennies for a TIG welder though. Can't be bothered with a MIG, they're for car body-shops & I never mastered them at college. I trained on MIG, TIG, Arc & gas welders at college & got on best with Arc (right from the beginning), gas & TIG were pretty natural to me as well, as I had done so much soldering as a kid. I reckon I could make good use of a TIG welder. They can do anything a MIG can & so much more besides.
BTW, all this stuff on welding is what I've found out from days of research on the internet & talking to a welding supplies shop. You could probably talk to 10 different welders & get 10 different opinions on welding cast iron. Best thing to do is have a go & see how you get on. I don't mind getting stuck in & having a go, but I'm not about to go welding up flywheels & stuff like that.
I have now ordered some different rods & am having a go at arc welding thin sheet materials (very tricky, but worth it if it saves me having to buy a MIG) & am having a go with some 7018 (low hydrogen) rods, which apparently can also weld certain types of cast iron.
It's all good fun & could save me a few quid in welding bills.
_________________
The "F" key is dying on my computer, please remember this when reading my posts, I'm trying to avoid using it.
The name's Matt, but call me Nutts if you like, there's already enough Matt's about.
nutgone- Life Member
- Posts : 2356
Join date : 2012-07-04
Age : 44
Location : East Sussex
Re: Bamfords SV 5hp (yet another project, they seem to be getting bigger!)
![]() by Lewis MacRae Sat Jun 15 2013, 10:55
by Lewis MacRae Sat Jun 15 2013, 10:55
_________________
Lewis
, x2 Lister D, x1 IHC LAA, x1 Lister L, x1 Wolseley WDII, x1 Amanco Chore Boy, x1 Fairbanks Morse Z 3 HP, x1 Crossley 1030?
Lewis MacRae- Admin
- Posts : 699
Join date : 2012-11-02
Location : Inverness, Scotland
Sponsored content
Page 1 of 2 • 1, 2 ![]()
|
|
|